Simplify with Colors
I like the noise when my agent team is working. As the output scrolls by, I can see that things are moving. When the screen sits still, I can't tell what's happening unless I open /tasks, the Claude Code command that lists what's running in the background, and read through it.
A few times it sat still, and I thought work was going on in the background. I should have checked /tasks, which would have shown that nothing was running. It turned out my prompt had misfired and quit instead of running. So at a glance, moving output is how I know things are getting done.
The trouble was what all that movement did to the things I needed to see. Other work kept running in the background, and the chat didn't wait for me. Unless I sat glued to the screen, the questions and to-dos meant for me scrolled up and off the page. I missed things often, and the same questions kept coming up again and again.
Rather than cut the noise, I gave the four things that matter their own colors in the chat panel I work in.
The colors don't stop anything from scrolling, and the to-dos still move up the page with everything else. What changed is how fast I find them when I come back. The yellow boxes stand out when I scroll up, and every reply ends with a short to-do list, so the bottom of the latest reply shows what's waiting on me.
This page shows what that looks like, the rules I gave my AI, and how I set up the colors, in case any of it helps you.
The four colors
- Green: my prompts. Everything I type sits on a green band.
- Yellow: something I need to do. Anything that needs me shows in a yellow box, and nothing else does.
- Orange: worth a look, nothing to do. The team hit a problem and fixed it without me, and it tells me so in one orange line.
- Red: time for a new chat. The chat is getting too long, and it's time to start a new one.
Yellow is the one I protect most, because if anything else turns yellow, yellow stops meaning "act."
What it looks like
Both pictures are made up for this page. They are not screenshots of my real work.
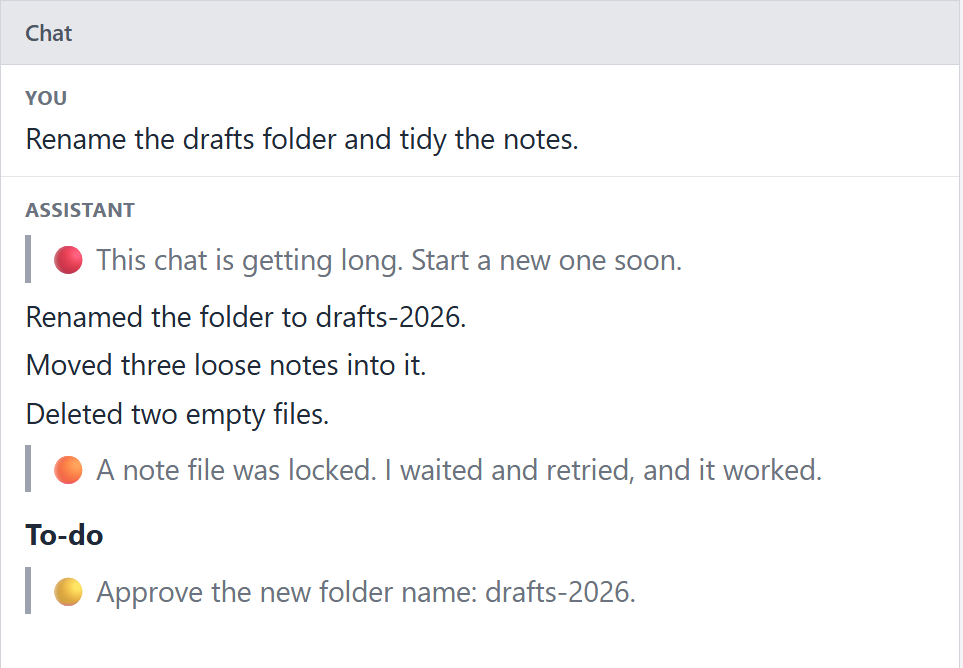
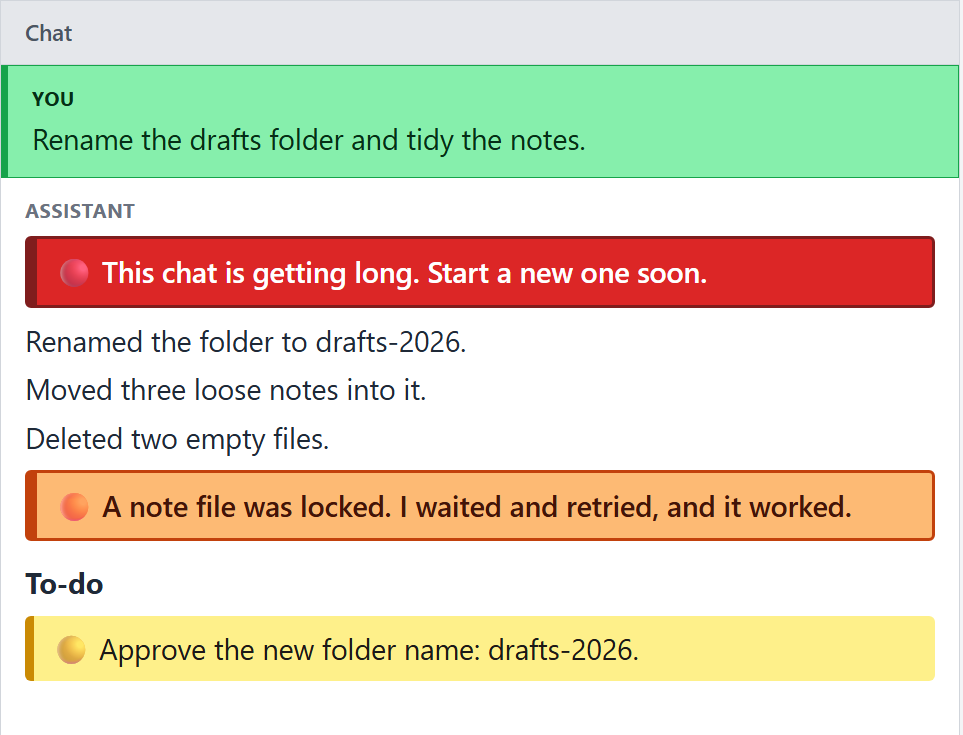
Where the colors come from
Two pieces work together.
- The rules tell the AI how to mark each line. In the chat panel, a line that starts with ">" shows as a quote. My rules use one ">" for a to-do, two for a red warning and three for an orange note, and each one starts with a colored dot.
- The tweak paints them. It's a small block of color rules added to the end of the panel's style file. It turns those quote lines into colored boxes and puts the green band under my prompts.
Without the tweak, the AI still puts the colored dots on those lines, and that already helps. The boxes and the green band come from the tweak.
The tweak paints every quote line, not just the ones you meant as alerts. That's why the rules tell the AI to use italics when it quotes something.
The rules I gave my AI
Here are the rules I gave mine, in case they help. They live in my AI's standing instructions, so if you try them, that's where they would go. In Claude Code, standing instructions go in a file called CLAUDE.md, and the one at ~/.claude/CLAUDE.md applies to every project.
~/.claude/CLAUDE.md1. Anything I must do myself goes on its own line, starting with "> 🟡". Only three kinds of line start with ">": "> 🟡", ">> 🔴" and ">>> 🟠". To quote something, use italics.
2. End every reply with a short To-do list. Each thing I must do is a "> 🟡" line. Things that need nothing from me stay plain. If there is nothing for me to do, one plain line says so.
3. If something went wrong and you fixed it without me, tell me in one line starting with ">>> 🟠". Never put a to-do in orange.
4. If this chat seems to be getting too long, tell me in one line starting with ">> 🔴" and suggest a new one. Use red for nothing else.
One note on red. In my setup, a separate small check measures how long the chat has grown and tells the AI when to raise the red line. With the rule alone, the AI is judging that for itself, so treat red as a rough guide.
How I set it up
The steps below look like a lot, and they aren't what I did. I told Claude what I wanted, and it set it up for me. If you'd like Claude to do the same for you, the next part shows what it needs. The by-hand steps come after that, for anyone who would rather do it themselves or see exactly what changes.
Before you start
- You need Node.js installed. The script is written for it, and any current version works. Nothing else needs installing.
- It's unofficial. The extension has no setting for these colors, so the tweak adds them to the end of one of its own style files. Nobody at the maker supports it.
- It only changes how things look. The color block doesn't change what the AI does.
- Updates wipe it. Each extension update brings a fresh style file, and the colors are gone. The script puts them back each time you start a session.
- The version here is smaller than mine. It covers the green band and the three colored boxes, in light and dark themes.
- You can undo it. The steps are at the bottom of this page.
Keep it safe
The script runs on your own computer every time a session starts, so read it before you use it. Keep the script and the color file in a folder that only you can change, inside your own user folder. Not a shared folder, and not one that syncs to the cloud. Anyone who could change them could run their own code at every session start, or make the panel hide things from you.
Let Claude do it
You need the same tools either way: VS Code, the Claude Code extension and Node.js.
Claude will need to change three places, and the script changes a fourth:
- Your user-level CLAUDE.md (
~/.claude/CLAUDE.md), for the four rules. - Your user-level settings file (
~/.claude/settings.json), for the hook that runs the script at each session start. - A new folder you pick, for
colors.cssandapply-colors.js. Pick one that only you can change. - The extension's own style file. Claude doesn't edit this one. The script changes it when it runs, at your next session start. It's
webview/index.cssin the newestanthropic.claude-code-...folder inside~/.vscode/extensions.~/.vscode/extensions
Before you start, click the mode at the bottom of the prompt box and switch it to Manual. In Manual, Claude Code asks before it edits a file and before most commands it runs, so you see each step before it happens. Read each one first, and say yes only when it matches what you asked for. If it offers to stop asking, for this session or for good, say no.
Then paste this prompt, and under it paste the four rules, the color block, the script and the hook setting from this page.
Set up the chat colors from the page text I've pasted below.
1. Add the four rules to my user-level CLAUDE.md (~/.claude/CLAUDE.md).
2. Make the folder <your folder>. Save the color block there as colors.css and the script as apply-colors.js, exactly as pasted.
3. Add the SessionStart hook to my user-level settings file (~/.claude/settings.json), pointed at that folder. Keep every entry that is already in the file.
Change nothing else, and don't run the script. Show me each change before you make it.
Pasting the code yourself means Claude works from exactly what you read. When it's done, open the two saved files and check they match this page. Then turn it on and check it, as in Steps 5 and 6 below.
Or do it by hand
These steps make the same changes yourself.
What you need
- VS Code with the Claude Code extension.
- Node.js.
- A recent version of VS Code. On an older one, the red and orange boxes show as yellow.
Step 1. Add the rules
Copy the four rules above into your standing instructions file and save it.
Step 2. Save the color block
Make a new folder for the two files. Save this block in it as colors.css.
colors.css/* claude-panel-colors:start */
/* Colors for the Claude Code chat panel in VS Code. Unofficial.
Green = your prompts. In Claude's replies: "> " yellow, ">> " red, ">>> " orange. */
body {
--green-bg: #86efac; --green-fg: #052e16; --green-edge: #16a34a;
--yellow-bg: #fef08a; --yellow-fg: #1c1917; --yellow-edge: #ca8a04;
--red-bg: #dc2626; --red-fg: #ffffff; --red-edge: #7f1d1d;
--orange-bg: #fdba74; --orange-fg: #431407; --orange-edge: #c2410c;
}
body.vscode-dark, body.vscode-high-contrast {
--green-bg: #166534; --green-fg: #f0fdf4; --green-edge: #4ade80;
--yellow-bg: #7a5c00; --yellow-fg: #fefce8; --yellow-edge: #facc15;
--red-bg: #b91c1c; --red-fg: #ffffff; --red-edge: #fca5a5;
--orange-bg: #f97316; --orange-fg: #1a0a00; --orange-edge: #fed7aa;
}
/* Your prompts: a full-width green band. */
[class*="userMessageContainer_"] { display: block; width: 100%; }
[class^="userMessage_"], [class*=" userMessage_"] {
--app-input-background: var(--green-bg);
--app-primary-foreground: var(--green-fg);
--app-secondary-foreground: var(--green-fg);
display: block; max-width: none; padding: 6px 10px;
background: var(--green-bg) !important; color: var(--green-fg) !important;
border: 1px solid var(--green-edge) !important; border-left-width: 5px !important;
}
/* Quote boxes in Claude's replies. The number of ">" picks the color. */
[data-testid="assistant-message"] blockquote {
--bg: var(--yellow-bg); --fg: var(--yellow-fg); --edge: var(--yellow-edge);
background: var(--bg) !important; color: var(--fg) !important;
border: 0 !important; border-left: 6px solid var(--edge) !important;
border-radius: 4px; margin: 6px 0 !important; padding: 6px 10px !important;
}
[data-testid="assistant-message"] blockquote:has(> blockquote) {
--bg: var(--red-bg); --fg: var(--red-fg); --edge: var(--red-edge); font-weight: 600;
}
[data-testid="assistant-message"] blockquote:has(> blockquote > blockquote) {
--bg: var(--orange-bg); --fg: var(--orange-fg); --edge: var(--orange-edge);
}
/* The inner quotes melt into the outer box, so it reads as one box. */
[data-testid="assistant-message"] blockquote blockquote {
background: none !important; color: inherit !important;
border: 0 !important; margin: 0 !important; padding: 0 !important;
}
/* claude-panel-colors:end */
Step 3. Save the script
Save this in the same folder as apply-colors.js. It finds the newest Claude Code extension on your computer and makes a backup of its style file, named index.css.orig, right next to it. Then it adds the color block to the end, once. If you run it again, it changes nothing, and if it can't find the extension, it quietly does nothing.
apply-colors.js#!/usr/bin/env node
// apply-colors.js - adds colors.css (kept next to this file) to the Claude Code
// VS Code extension's chat panel styles. Needs Node.js. Unofficial.
//
// node apply-colors.js use the normal VS Code extensions folder
// node apply-colors.js <folder> use another extensions folder (a test copy,
// or e.g. ~/.vscode-insiders/extensions)
// add --verbose print what it did
//
// Prints nothing and always exits 0, so it can never block a Claude Code session.
'use strict';
const fs = require('fs');
const path = require('path');
const os = require('os');
const START = '/* claude-panel-colors:start */';
const END = '/* claude-panel-colors:end */';
const args = process.argv.slice(2);
const verbose = args.includes('--verbose');
const root = args.find((a) => !a.startsWith('--')) || path.join(os.homedir(), '.vscode', 'extensions');
const say = (msg) => { if (verbose) console.log(msg); };
// The newest installed Claude Code extension, skipping versions VS Code has retired.
function newestExtension() {
let names;
try { names = fs.readdirSync(root); } catch (e) { return null; }
let retired = {};
try { retired = JSON.parse(fs.readFileSync(path.join(root, '.obsolete'), 'utf8')); } catch (e) {}
const ver = (n) => (n.match(/^anthropic\.claude-code-(\d+)\.(\d+)\.(\d+)/i) || []).slice(1).map(Number);
const found = names
.filter((n) => ver(n).length === 3 && !retired[n])
.sort((a, b) => { const x = ver(a), y = ver(b); return x[0] - y[0] || x[1] - y[1] || x[2] - y[2]; });
return found.length ? path.join(root, found[found.length - 1]) : null;
}
try {
const ext = newestExtension();
const file = ext && path.join(ext, 'webview', 'index.css');
if (!file || !fs.existsSync(file)) { say('No Claude Code extension found in ' + root); process.exit(0); }
const block = fs.readFileSync(path.join(__dirname, 'colors.css'), 'utf8').trim();
if (!block.startsWith(START) || !block.endsWith(END)) { say('colors.css lost its start/end lines'); process.exit(0); }
const css = fs.readFileSync(file, 'utf8');
const s = css.indexOf(START);
const e = s < 0 ? -1 : css.indexOf(END, s);
if (s >= 0 && e < 0) { say('Start line with no end line, left the file alone: ' + file); process.exit(0); }
if (s >= 0 && e >= 0 && css.slice(s, e + END.length) === block) { say('Already applied: ' + file); process.exit(0); }
// One-time backup of the untouched original, saved next to it as index.css.orig.
const backup = file + '.orig';
if (s < 0 && !fs.existsSync(backup)) fs.copyFileSync(file, backup);
// Take out an older copy of the block (if any), then add the current one at the end.
const base = s < 0 ? css : css.slice(0, s) + (e >= 0 ? css.slice(e + END.length) : '');
const tmp = file + '.tmp';
fs.writeFileSync(tmp, base.trimEnd() + '\n\n' + block + '\n');
try { fs.renameSync(tmp, file); } catch (err) { fs.unlinkSync(tmp); throw err; }
say((s < 0 ? 'Applied: ' : 'Updated: ') + file);
} catch (err) {
say('Skipped: ' + err.message);
}
process.exit(0);
Step 4. Run it at each session start
Claude Code can run a command each time a session starts, using a setting called a SessionStart hook. Add this to your Claude Code settings file, ~/.claude/settings.json, which applies to every project. Replace <path-to> with the folder where you saved the script. On Windows, use forward slashes, like C:/Users/you/panel-colors. Backslashes break the settings file. Before you change the file, save a copy of it.
~/.claude/settings.json{
"hooks": {
"SessionStart": [
{
"matcher": "startup|resume|clear",
"hooks": [
{
"type": "command",
"command": "node \"<path-to>/apply-colors.js\"",
"timeout": 10
}
]
}
]
}
}
If your settings file already has a "hooks" section, put only the SessionStart part inside it. If it already has a "SessionStart" list, leave the entries that are there alone and add this one to the same list, with a comma between them. Claude Code runs every matching entry in the list, so your old commands keep working. Keep just one "hooks" and one "SessionStart" in the file, with everything inside them.
Step 5. Turn it on
Start a new session so the script runs. Then reload the VS Code window: open the Command Palette and choose "Developer: Reload Window".
Developer: Reload WindowStep 6. Check it
Your next prompt should sit on a green band. If you ask the AI to reply with one line starting with "> 🟡", that line should show in a yellow box.
The script prints nothing by design. To see the one file it changed, run it once yourself with --verbose on the end: node "<path-to>/apply-colors.js" --verbose.
node "<path-to>/apply-colors.js" --verboseAfter an update
When the extension updates, the colors drop off until the script runs again. Right after an update, the panel may look plain at first. Start a session, reload the window, and they're back.
If the extension ever renames the parts of the panel that the tweak looks for, the colors just stop showing, and the panel looks the way it does without the tweak. That's the one failure I know of. I can't promise how every future update will behave, so if the panel ever looks wrong, the undo steps below put the original style file back.
How to undo it
- Stop it coming back. Open your Claude Code settings file (
~/.claude/settings.json) and delete the hook entry that runsapply-colors.js. If it was the only SessionStart hook, delete the whole"SessionStart"block. - Take the colors out. Pick one:
- a. Copy the backup over the styled file. In your VS Code extensions folder, open the newest
anthropic.claude-code-...folder, thenwebview. Copyindex.css.origoverindex.css. - b. Or just let VS Code update or reinstall the Claude Code extension. A fresh install has no colors.
- a. Copy the backup over the styled file. In your VS Code extensions folder, open the newest
- Reload VS Code (Command Palette, then "Developer: Reload Window").
- Optional: delete the folder where you saved
apply-colors.jsandcolors.css.
I kept the noise, because it tells me the work is moving. What helped most was using each color for one thing and nothing else.